

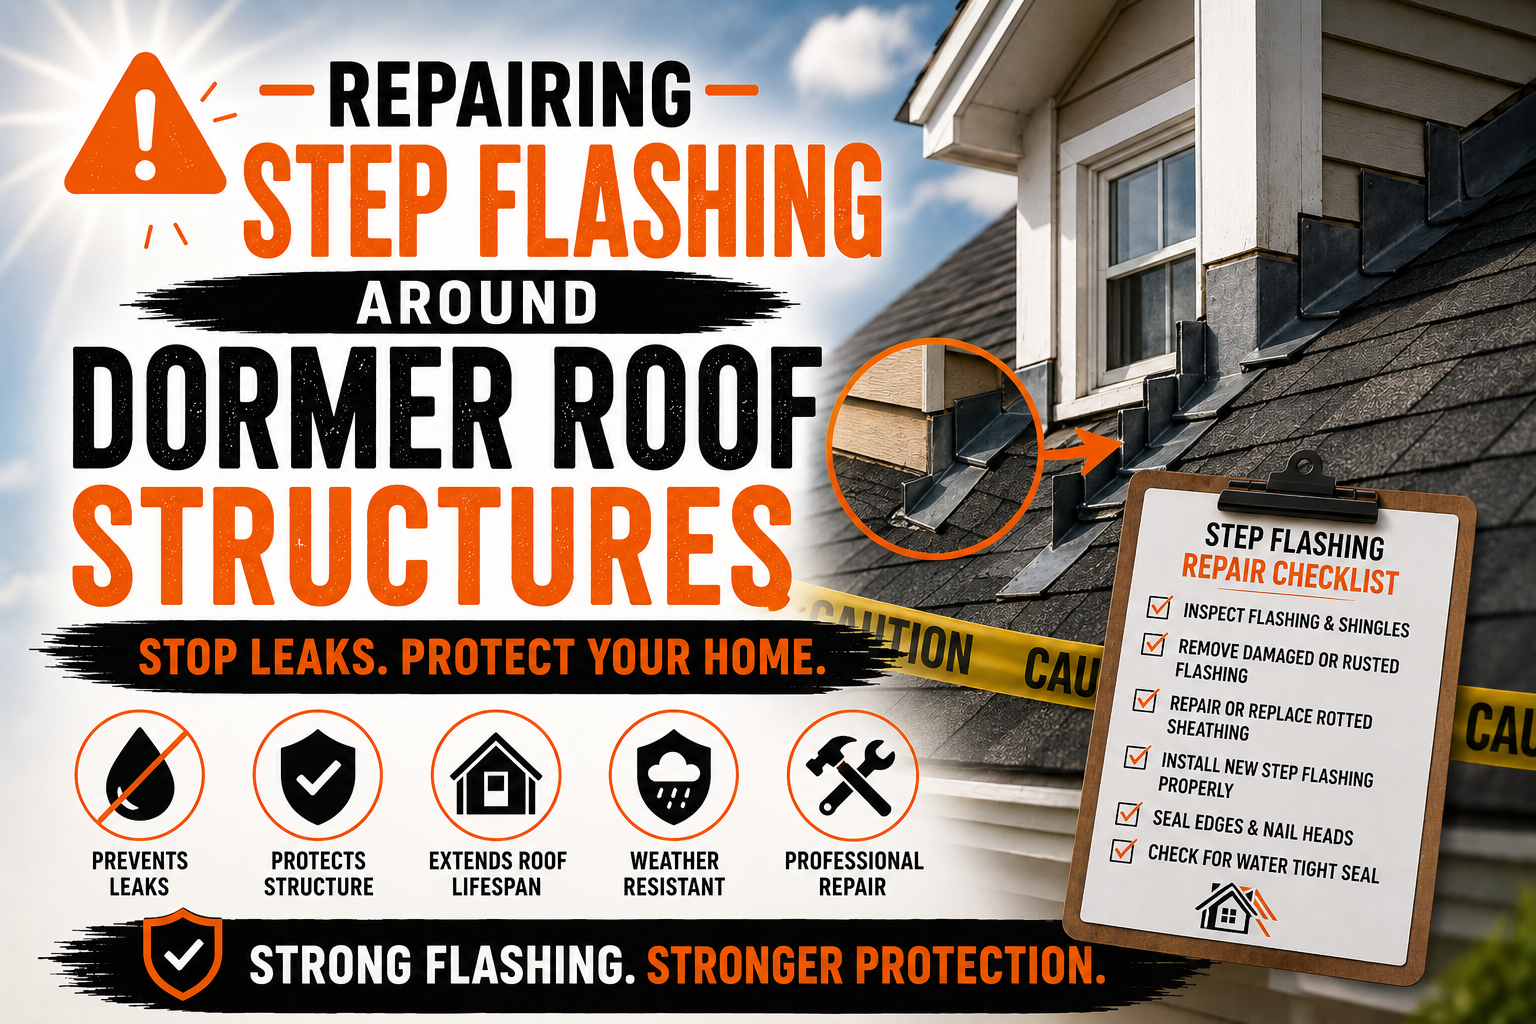
Repairing Step Flashing Around Dormer Roof Structures
Introduction
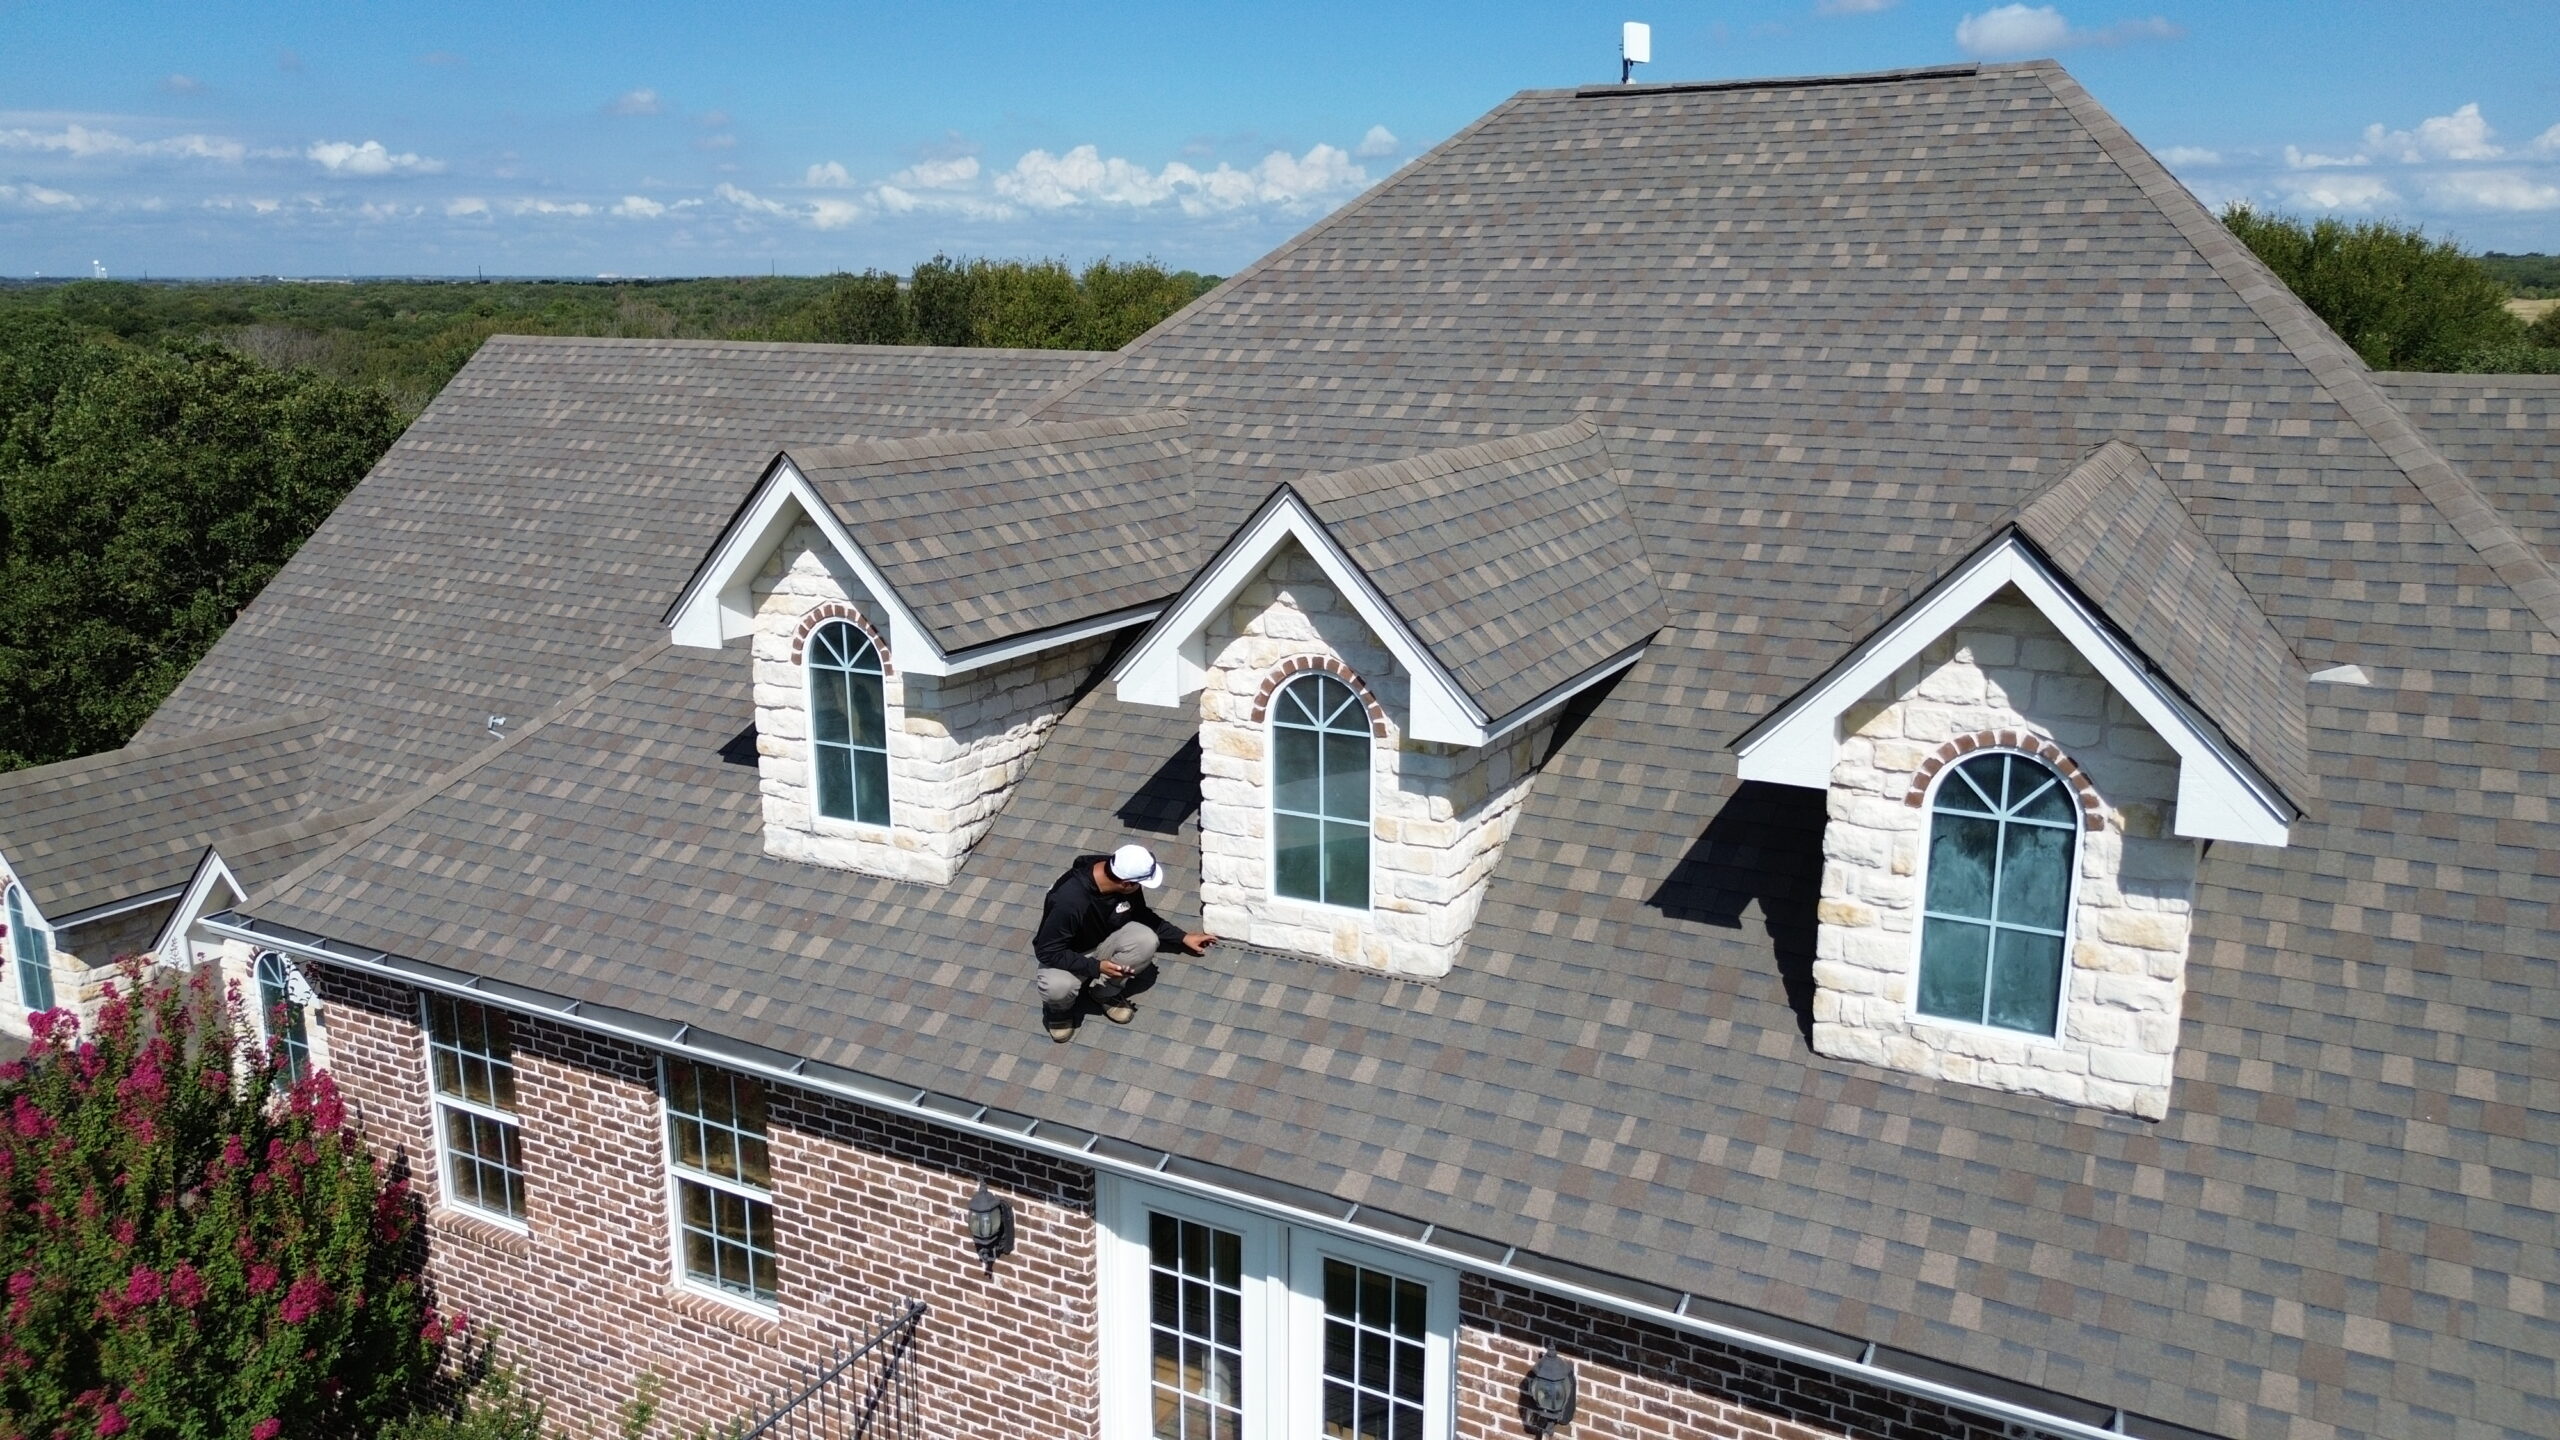
Dormers add architectural character, increase usable interior space, and allow more natural light into upper levels of a home. While these roof features offer both functional and aesthetic benefits, they also create some of the most vulnerable areas in a roofing system. Wherever a dormer wall meets the roof surface, water management becomes more complex, making proper flashing installation essential for preventing leaks.
One of the most important components protecting these roof to wall intersections is step flashing. Unlike large continuous pieces of flashing, step flashing uses individual metal sections layered with each course of shingles. This overlapping design directs rainwater safely down the roof while preventing moisture from entering behind the dormer walls.
Over time, however, step flashing can become damaged by weather, corrosion, roof movement, or improper installation. Even a small defect may allow water to bypass the flashing system and reach the roof deck, insulation, or wall framing. Because these problems often develop gradually, homeowners may not notice the damage until water stains or leaks appear inside the home.
Repairing step flashing around dormer roof structures requires more than replacing a few pieces of metal. Successful repairs involve understanding how the flashing works with shingles, underlayment, and wall coverings to create a complete waterproof barrier. Every layer must function together to guide water safely away from vulnerable joints.
This guide explains the purpose of step flashing, how dormer roof structures create unique drainage challenges, the common causes of flashing failure, and the warning signs homeowners should recognize before small leaks become expensive structural repairs.
What Is Step Flashing?
Step flashing is a roofing component made from individual pieces of metal installed where a sloped roof meets a vertical wall. Each piece overlaps the shingle below while extending upward against the wall, creating a layered system that directs water safely down the roof instead of allowing it to enter the building.
Unlike continuous flashing, which uses one long strip of metal, step flashing consists of multiple separate sections installed one at a time. Each flashing piece works together with an individual shingle course, creating a flexible drainage system that accommodates both water flow and natural roof movement.
This layered design is especially effective because it follows the same overlapping principle as asphalt shingles. Rainwater naturally flows over one flashing section, onto the next, and eventually toward the gutters without reaching the roof deck beneath.
Step flashing is commonly manufactured from corrosion resistant metals that provide long term durability under changing weather conditions. The most frequently used materials include galvanized steel, aluminum, copper, and stainless steel, each offering different advantages depending on the climate and roofing system.
Proper installation is just as important as material selection. Even high quality flashing cannot protect the roof effectively if the individual pieces are installed in the wrong sequence or fail to overlap correctly with surrounding shingles.
Understanding Dormer Roof Structures
Dormers are roof extensions that project outward from the main roof, creating additional headroom and usable interior space beneath the roofline. They also improve natural lighting by allowing windows to be installed in areas that would otherwise remain enclosed by the roof.
Although dormers enhance both appearance and functionality, they introduce several roof to wall intersections where water naturally concentrates during rainfall. These transition points require careful waterproofing because water flowing down the main roof changes direction as it encounters the dormer walls.
Different dormer styles create different drainage patterns. Gable dormers feature peaked roofs that channel water toward both sides of the structure. Shed dormers have a single sloping roof that directs water toward one side, while hipped dormers create multiple drainage paths because of their more complex roof geometry.
Regardless of style, every dormer includes vertical walls meeting sloped roofing surfaces. These joints cannot rely on shingles alone for protection because shingles are designed primarily for horizontal water flow rather than vertical wall transitions.
Flashing bridges this gap by connecting the roofing system with the wall assembly. Together with underlayment and weather resistant barriers, step flashing creates a continuous path that allows water to leave the roof safely without entering the home’s structure.
Understanding how dormers affect water movement helps explain why flashing problems frequently develop in these locations if installation or maintenance is neglected.
How Step Flashing Protects Dormers
Rainwater naturally follows gravity as it moves across the roof surface. Step flashing is designed to guide this water around vulnerable roof to wall intersections while preventing moisture from reaching the structural components beneath the roofing materials.
Each piece of flashing is installed between successive rows of shingles. The lower edge rests on top of the shingle while the vertical leg extends upward against the dormer wall. As rainwater reaches each flashing section, it continues flowing downward onto the next shingle course rather than entering the joint between the wall and roof.
The overlapping arrangement creates multiple layers of protection. Even if wind driven rain reaches one flashing section, the next overlapping piece continues directing water safely away from the building.
Step flashing also works together with other roofing components. Underlayment beneath the shingles provides secondary moisture protection, while house wrap or weather resistant barriers behind the siding help prevent water from reaching the wall framing.
Proper integration between these materials is essential. If one component is installed incorrectly, the entire drainage system becomes less effective, increasing the likelihood of leaks around the dormer.
Because dormer intersections experience repeated exposure to rain, snow, ice, and wind driven moisture, step flashing serves as one of the most important waterproofing elements in these areas.
Common Causes of Step Flashing Damage
Step flashing is designed for long term durability, but years of weather exposure and natural roof movement eventually affect its condition. Understanding the most common causes of flashing damage helps homeowners recognize why repairs become necessary over time.
Aging is one of the leading factors. As roofing systems grow older, repeated exposure to sunlight, rainfall, freezing temperatures, and seasonal expansion gradually weakens flashing materials and surrounding sealants. Although metal flashing generally lasts many years, its protective performance may decline if other roofing components begin deteriorating.
Improper installation creates another frequent source of problems. Flashing pieces installed with insufficient overlap, incorrect fastening methods, or poor integration with shingles cannot direct water as intended. These installation errors may remain hidden until severe weather exposes the weakness.
Windstorms also place significant stress on dormer flashing. Strong winds may lift shingles, loosen flashing sections, or allow wind driven rain to reach vulnerable joints that normally remain protected.
Corrosion develops gradually in some environments, particularly where flashing has been scratched, protective coatings have worn away, or incompatible metals create galvanic reactions. Rust weakens flashing over time and eventually creates openings that permit water intrusion.
Natural roof movement contributes additional stress. Roofing materials expand during warm weather and contract as temperatures fall. These repeated cycles gradually affect fasteners, flashing joints, and surrounding materials, increasing the possibility of separation if repairs are delayed.
Early Warning Signs of Flashing Problems
Step flashing problems often develop slowly, making early detection important for preventing expensive structural repairs. Homeowners who recognize the first warning signs can arrange timely maintenance before water damage spreads beyond the flashing itself.
Interior water stains near dormer walls are among the most common indicators. Brown discoloration on ceilings or upper walls often suggests moisture entering where the roof meets the dormer structure.
Attic inspections may reveal damp insulation, wet roof decking, or signs of condensation near dormer intersections. Although these symptoms may result from several roofing issues, damaged flashing should always be considered during the inspection.
Loose or lifted shingles around the dormer also deserve attention. Because flashing and shingles work together, movement in one component frequently affects the other. Wind lifted shingles may expose flashing sections that become more vulnerable to moisture intrusion.
Visible rust or corrosion on exposed flashing indicates that protective coatings may be deteriorating. While minor surface discoloration does not always require immediate replacement, advanced corrosion weakens the flashing and increases the likelihood of leaks.
Homeowners should also watch for mold, mildew, or peeling paint on interior dormer walls. Persistent moisture entering through damaged flashing often creates favorable conditions for biological growth before obvious roof leaks become apparent.
Identifying these warning signs early allows repairs to remain relatively simple while preventing more extensive water damage throughout the roof and wall system.
Why Proper Flashing Installation Is Essential
The effectiveness of step flashing depends not only on the quality of the metal but also on how it is installed. Proper installation creates a continuous drainage path that works with gravity rather than relying on sealants alone to prevent leaks.
Each flashing piece must overlap the one below while extending far enough beneath the shingle above to direct water safely toward the roof edge. This layered arrangement allows rainwater to move naturally across the roof without reaching the underlying wood structure.
Fastener placement also plays an important role. Nails should secure the flashing where recommended without creating unnecessary openings that could allow moisture penetration. Improper fastening may loosen flashing over time or interfere with the roof’s ability to expand and contract during seasonal temperature changes.
The flashing must also integrate correctly with underlayment and wall moisture barriers. These surrounding materials provide secondary protection if wind driven rain bypasses the primary flashing system. Together they create multiple layers of defense against water intrusion.
When any portion of this installation sequence is performed incorrectly, the roof becomes more vulnerable to leaks. Even small installation mistakes may remain hidden for years before moisture gradually damages roof decking, insulation, framing, or interior finishes.
Proper installation therefore protects far more than the flashing itself. It safeguards the entire roofing system while helping preserve the long term structural integrity of the home.
The Importance of Routine Dormer Maintenance
Dormers require regular maintenance because their roof to wall intersections experience heavier water exposure than many other parts of the roof. Routine inspections help identify developing flashing issues before they become significant repair projects.
Seasonal roof inspections should include careful examination of shingles surrounding the dormer, visible flashing sections, sealant condition, and nearby siding. Small changes such as lifted flashing edges or loose shingles often indicate that maintenance is needed.
Cleaning debris from roof valleys and around dormers also supports proper drainage. Leaves, branches, and accumulated dirt can trap moisture against flashing for extended periods, increasing the likelihood of corrosion and water infiltration.
Homeowners should also inspect dormers after major storms. High winds, hail, and falling branches may damage flashing even when no obvious leaks are immediately visible. Early inspection allows minor repairs to be completed before repeated rainfall enlarges the affected area.
Routine maintenance also extends the lifespan of surrounding roofing materials. Well maintained flashing helps protect shingles, underlayment, roof decking, and wall framing from unnecessary moisture exposure, reducing the likelihood of expensive structural repairs later.
By combining regular inspections with prompt maintenance, homeowners can significantly improve the long term performance of step flashing and reduce the risk of unexpected leaks around dormer roof structures.
Inspecting Dormer Flashing Safely
Before repairing step flashing, it is important to perform a careful inspection to determine the extent of the damage. Dormer intersections often contain several roofing components working together, so identifying the true source of a leak helps prevent unnecessary repairs while ensuring the correct problem is addressed.
The inspection should begin inside the home whenever possible. Water stains on ceilings, damp insulation in the attic, peeling paint near dormer walls, or mold growth may help pinpoint areas where moisture has entered the structure. These interior signs often provide valuable clues before anyone climbs onto the roof.
Exterior inspections should be performed only under safe weather conditions. Wet shingles, strong winds, or icy roof surfaces significantly increase the risk of falls and should never be ignored. If conditions are unsafe, postponing the inspection until the roof is dry is the safest option.
Once on the roof, the inspection should include the flashing itself as well as the surrounding shingles, siding, sealants, and roof decking where visible. Damage affecting one component often influences nearby materials, making a complete evaluation more effective than focusing only on the flashing.
Photographing visible damage during the inspection also creates a useful record for planning repairs and comparing the roof’s condition after the work has been completed.
Removing Damaged Shingles Around the Dormer
Step flashing is installed beneath the shingles, which means damaged roofing materials usually need to be removed before the flashing can be repaired or replaced. Careful removal protects reusable shingles while minimizing disturbance to the surrounding roof.
The repair area should first be cleared of loose debris such as leaves, branches, dirt, and damaged roofing fragments. A clean work area allows shingles to be lifted more easily while reducing the possibility of additional damage during removal.
Roofing nails securing the affected shingles should be removed carefully using appropriate roofing tools. Excessive force may crack nearby shingles that remain in good condition, creating unnecessary repairs beyond the original problem.
Each shingle should be lifted gradually without bending it excessively. Older asphalt shingles often become more brittle with age, especially after years of sun exposure. Gentle handling improves the chances of preserving reusable materials whenever possible.
As the shingles are removed, the underlying flashing becomes accessible for inspection. This provides an opportunity to evaluate not only the visible damage but also the condition of the roof deck, underlayment, and fasteners hidden beneath the roofing surface.
Organizing removed materials during the repair process also simplifies reinstallation if some shingles remain suitable for reuse after the flashing has been repaired.
Evaluating Existing Step Flashing
With the shingles removed, the flashing can be inspected more thoroughly to determine whether repair or replacement is the most practical solution. Surface appearance alone does not always indicate the flashing’s structural condition, so every section should be examined carefully.
Minor surface discoloration or light oxidation may not require complete replacement if the flashing remains structurally sound. However, deeper corrosion, holes, cracks, or significant bending generally reduce the flashing’s ability to direct water effectively.
The overlap between individual flashing pieces should also be evaluated. Properly installed step flashing forms a continuous drainage path with each section overlapping the one below. Gaps, misalignment, or insufficient overlap increase the likelihood of water entering beneath the roofing materials.
Fasteners deserve close attention as well. Loose nails, missing fasteners, or evidence of repeated movement may indicate that the flashing has shifted over time because of wind exposure or seasonal roof expansion and contraction.
The surrounding roof deck should also be inspected for signs of moisture damage. Soft wood, discoloration, mold, or rot suggest that water has already bypassed the flashing system and may require additional structural repairs before new flashing is installed.
Careful evaluation ensures the repair addresses the actual source of the problem rather than simply covering visible symptoms.
Replacing Individual Flashing Pieces
One advantage of step flashing is that individual sections can often be replaced without removing the entire flashing system. If the damage is limited to only a few pieces, localized replacement provides an effective repair while preserving the remaining flashing that continues to perform properly.
Each damaged flashing section should be removed carefully without disturbing neighboring pieces unnecessarily. Maintaining the integrity of surrounding materials reduces labor while helping preserve the existing waterproofing system.
Replacement flashing should match the original material whenever practical. Using compatible metals minimizes differences in expansion, appearance, and corrosion resistance while helping the repaired area perform consistently with the existing flashing.
Every replacement piece should be positioned according to the original installation sequence. The lower portion rests on the shingle while the vertical section extends upward against the dormer wall. Correct alignment ensures water continues flowing naturally from one flashing piece to the next.
Proper overlap between adjacent flashing sections is essential. Water should always travel over each layer rather than encountering exposed joints where it could penetrate beneath the roofing system.
Once each replacement piece has been secured correctly, the repair area is ready for shingle reinstallation while maintaining the roof’s original drainage pattern.
Installing New Flashing Correctly With Shingles
Step flashing and shingles work together as one integrated system. Installing flashing without properly coordinating the surrounding shingles reduces the effectiveness of both components and increases the likelihood of future leaks.
Each flashing piece should be installed as a new shingle course is laid. This alternating pattern creates the overlapping layers that allow rainwater to move safely down the roof while preventing moisture from reaching the roof deck.
Shingles should cover the horizontal leg of each flashing section while leaving enough exposure for proper drainage. Maintaining consistent alignment throughout the repair helps preserve both appearance and water shedding performance.
Fasteners should be positioned according to manufacturer recommendations. Nails should secure the shingles without penetrating areas where they could create unnecessary water entry points through the flashing.
The repair should also integrate smoothly with underlayment and weather resistant wall barriers. These secondary moisture protection systems support the flashing by directing any wind driven moisture safely back onto the roof surface.
Careful attention to each layer during installation ensures the repaired dormer intersection performs as a complete waterproof assembly rather than as separate individual components.
Comparing Common Step Flashing Problems
Different flashing problems require different repair approaches. Understanding the characteristics of each issue helps homeowners appreciate why professional inspections are often necessary before repairs begin.
| Flashing Problem | Common Cause | Visible Symptoms | Recommended Repair |
|---|---|---|---|
| Rusted Flashing | Long term moisture exposure and aging | Corrosion, discoloration, small holes | Replace affected flashing sections |
| Bent Flashing | Storm damage or impact from debris | Distorted metal and poor water flow | Replace damaged pieces and inspect surrounding shingles |
| Loose Flashing | Fastener failure or roof movement | Lifted flashing edges and water entry | Refasten or replace flashing as needed |
| Missing Flashing | Previous repairs or storm damage | Exposed roof to wall joint | Install new properly overlapped flashing |
| Improper Overlap | Incorrect original installation | Recurring leaks and poor drainage | Reinstall flashing following correct installation sequence |
Each of these conditions affects the roof’s ability to direct water away from vulnerable dormer intersections. Correct diagnosis ensures repairs address the underlying cause instead of only the visible symptoms.
Common Mistakes During Step Flashing Repairs
Repairing dormer flashing requires careful attention to installation details. Even experienced workers can create future leak points if important steps are overlooked during the repair process.
One common mistake is attempting to repair damaged flashing with excessive sealant instead of correcting the underlying installation problem. Roofing sealants provide temporary protection but should not replace properly installed flashing.
Another frequent error involves reusing severely corroded flashing. Although minor surface wear may be acceptable, flashing with holes, deep rust, or structural weakness no longer provides dependable long term performance.
Improper overlap between replacement flashing sections also reduces effectiveness. Water naturally follows gravity, so each flashing piece must direct water onto the next section without exposing gaps where moisture can enter.
Fastening errors create additional concerns. Nails placed in incorrect locations may puncture vulnerable areas of the flashing or interfere with natural roof movement during seasonal temperature changes.
Some repairs also fail because surrounding shingles are installed incorrectly after flashing replacement. Misaligned shingles, damaged sealant strips, or improper fastening can compromise even perfectly installed flashing by allowing water beneath the roofing system.
Avoiding these mistakes significantly improves both the durability and reliability of dormer flashing repairs.
Testing the Repair for Proper Water Protection
After the flashing and shingles have been reinstalled, the repair should be evaluated to confirm that water flows away from the dormer as intended. Testing provides confidence that the repair has restored the roof’s ability to protect the structure beneath.
A visual inspection is the first step. Flashing should lie flat against the dormer wall, overlap correctly with adjacent pieces, and integrate smoothly with the surrounding shingles. Any visible gaps or uneven alignment should be corrected before the repair is considered complete.
Controlled water testing may also be performed when appropriate. Water is applied gradually above the repaired section while another person observes the interior attic or ceiling for signs of moisture intrusion. Applying water slowly helps simulate natural rainfall more accurately than directing high pressure streams onto the roof.
The repaired area should also be monitored after the first significant rainfall. Natural weather conditions provide an additional opportunity to verify that drainage remains effective and no new leaks develop around the dormer.
It is also helpful to inspect nearby shingles after the repair has settled for several days. Properly installed flashing should support the surrounding roofing materials without causing lifted edges or irregular alignment.
Careful testing confirms that every component of the repair works together to provide dependable weather protection before the roof returns to normal service.
Why Professional Workmanship Matters
Although some minor roofing maintenance can be performed safely by experienced homeowners, repairing step flashing around dormers often requires specialized knowledge because multiple roofing and wall components must function together correctly.
Professional roofers understand how flashing interacts with shingles, underlayment, siding, weather barriers, and roof decking. They recognize subtle installation issues that may not be obvious during a basic visual inspection but could eventually lead to water intrusion.
Experienced contractors also know how to identify hidden structural damage beneath the flashing. Moisture trapped behind dormer walls may affect framing, insulation, or roof decking long before visible leaks appear inside the home. Addressing these problems during the repair prevents recurring issues after the flashing has been replaced.
Proper material selection is another important advantage. Professionals choose flashing materials compatible with the existing roofing system, reducing the likelihood of premature corrosion or expansion related problems that may occur when incompatible metals are combined.
Quality workmanship also supports long term roof performance. Correct installation techniques, proper overlap, careful fastening, and thorough final inspections all contribute to repairs that remain reliable through years of changing weather conditions.
Investing in professional flashing repairs often reduces future maintenance costs while protecting one of the roof’s most leak prone areas from unnecessary deterioration.
When Flashing Repairs Are Enough Versus Full Replacement
Not every flashing problem requires replacing the entire roof or even every piece of step flashing around the dormer. In many situations, localized repairs provide an effective solution, especially when the damage is identified early and the surrounding roofing materials remain in good condition.
If only one or two flashing sections have become bent, loose, or slightly corroded, replacing those individual pieces is often enough to restore proper water protection. The remaining flashing can continue performing effectively as long as it is structurally sound and correctly installed.
However, more extensive deterioration requires a broader approach. Widespread rust, repeated leaks, improper installation throughout the flashing system, or significant roof deck damage may indicate that replacing all step flashing around the dormer is the more reliable long term solution.
The age of the roof should also be considered. If the roofing system is nearing the end of its expected lifespan, replacing only the flashing may provide limited value because the surrounding shingles could require replacement in the near future. Coordinating flashing replacement with a roof replacement project often produces better long term results.
A professional roof inspection helps determine whether localized repairs are sufficient or whether replacing the entire flashing system will provide greater durability and protection.
Dormer Flashing Maintenance Checklist
Routine maintenance helps prevent many flashing problems before they develop into costly roof leaks. Consistent inspections also allow homeowners to identify small issues while repairs remain relatively simple.
- Inspect dormer flashing at least once each year.
- Check flashing and shingles after major storms or high winds.
- Remove leaves, branches, and debris from roof to wall intersections.
- Replace damaged or missing shingles promptly.
- Schedule professional roof inspections every few years or whenever leaks are suspected.
Following these maintenance steps reduces the likelihood of unexpected flashing failures while helping the roofing system perform reliably throughout changing seasons.
Preventing Future Dormer Flashing Problems
Preventive maintenance remains one of the most effective ways to protect dormer flashing and extend the lifespan of the entire roofing system. Although weather cannot be controlled, homeowners can reduce many common causes of flashing deterioration through regular care and timely repairs.
Keeping roof surfaces clean is an important first step. Leaves, pine needles, and other debris often collect around dormers where roof lines change direction. Trapped debris holds moisture against flashing and shingles, increasing the likelihood of corrosion and water infiltration over time.
Proper attic ventilation also contributes to flashing longevity. Excessive heat and moisture beneath the roof accelerate material aging while increasing expansion and contraction cycles that place stress on flashing joints and fasteners.
Promptly repairing damaged shingles is equally important. Since shingles and step flashing work together to direct water away from the dormer, problems affecting one component frequently increase stress on the other.
Homeowners should also avoid making unnecessary modifications around dormers without considering the flashing system. Installing new siding, replacing windows, or adding roof accessories may disturb existing flashing if proper precautions are not taken.
Routine maintenance combined with timely professional repairs greatly reduces the likelihood of future leaks while helping preserve both the roof and the dormer structure.

Best Materials for Long Lasting Step Flashing
The durability of a flashing repair depends not only on installation quality but also on selecting materials that perform well under local weather conditions. Different flashing materials offer varying levels of corrosion resistance, strength, and expected service life.
Galvanized steel remains one of the most commonly used flashing materials because it provides a practical balance between durability and affordability. Its protective zinc coating helps resist corrosion under normal environmental conditions.
Aluminum flashing offers another lightweight option that naturally resists rust. It is commonly used in residential roofing projects but should be selected carefully when other metals are present to avoid compatibility issues.
Copper flashing is widely recognized for its exceptional longevity. Although it generally involves a higher initial investment, copper develops a natural protective surface over time and can remain effective for decades when installed correctly.
Stainless steel provides excellent corrosion resistance and structural strength, making it particularly suitable for demanding climates where heavy rainfall, coastal conditions, or snow exposure place additional stress on roofing materials.
Choosing compatible materials is just as important as selecting durable ones. Flashing should work effectively with the existing roofing system to minimize long term maintenance while supporting consistent weather protection.
Professional Installation Best Practices
Even the highest quality flashing materials cannot compensate for poor installation. Professional roofing contractors follow established practices that ensure every flashing repair functions as part of a complete waterproof roofing system.
Careful preparation begins before any new flashing is installed. Contractors inspect the roof deck, underlayment, shingles, and dormer wall to identify hidden damage that could reduce the effectiveness of the repair if left uncorrected.
Each flashing piece is then installed individually, maintaining proper overlap with both the shingles and adjacent flashing sections. This layered approach allows gravity to direct water naturally down the roof without exposing vulnerable joints.
Fastener placement also requires careful attention. Nails should secure the flashing without penetrating areas where water is likely to flow. Correct fastening allows the flashing to remain stable while accommodating the roof’s natural expansion and contraction during seasonal temperature changes.
Professional installers also verify that the flashing integrates correctly with weather resistant wall barriers, siding, and roof underlayment. These surrounding components provide additional protection if wind driven rain reaches beyond the primary flashing system.
Quality control completes the process. Before leaving the job site, experienced contractors inspect alignment, overlap, drainage paths, and surrounding roofing materials to confirm the repair meets both manufacturer recommendations and industry standards.
Why Dormer Areas Require Routine Roof Inspections
Dormers create some of the most complex intersections on a residential roof. Because multiple building materials meet in these locations, they experience greater exposure to water, temperature changes, and natural building movement than many other parts of the roofing system.
Routine inspections help identify developing problems before they become visible inside the home. Small gaps in flashing, loose shingles, or early corrosion often produce no immediate leaks but gradually allow moisture to penetrate beneath the roofing materials.
Seasonal weather further emphasizes the need for regular inspections. Heavy rainfall, snow accumulation, ice formation, and strong winds repeatedly test the waterproofing system surrounding dormers. Inspecting these areas after severe weather helps identify damage while repairs remain relatively straightforward.
Professional inspections also evaluate components that homeowners may not easily recognize. Flashing overlap, underlayment condition, fastener placement, and hidden moisture damage often require experienced assessment to identify accurately.
Consistent inspection schedules provide another important benefit by extending the roof’s overall lifespan. Addressing minor maintenance issues promptly reduces stress on surrounding roofing materials while helping prevent larger structural repairs in the future.
Dormer flashing should therefore be viewed as an area deserving regular attention rather than only being inspected after leaks appear.
Coordinating Flashing Repairs With Overall Roof Maintenance
Flashing repairs are most effective when they become part of a broader roof maintenance program rather than isolated repair projects. Because every roofing component works together, maintaining the entire system improves the performance of the flashing as well.
Regular gutter cleaning supports proper drainage around dormers by preventing water from backing up onto the roof. Free flowing gutters reduce the amount of standing water near flashing and shingles during heavy rainfall.
Roof valleys should also be inspected periodically because they often direct large amounts of water toward dormer intersections. Keeping these areas free from debris allows water to move efficiently across the roof without unnecessary pooling.
Homeowners should also monitor nearby roofing components such as ridge caps, vents, pipe flashings, and chimney flashing. Problems in one section of the roof sometimes redirect water toward dormers, increasing the stress placed on step flashing even when the flashing itself remains properly installed.
Maintaining accurate records of inspections, repairs, and roofing improvements also benefits future maintenance planning. Contractors can evaluate previous work more effectively when they understand the roof’s repair history and the age of various components.
Viewing flashing maintenance as part of overall roof care helps maximize the lifespan of every roofing element while reducing the likelihood of recurring leaks.
Conclusion
Step flashing is one of the most important waterproofing components around dormer roof structures. By working together with shingles, underlayment, and weather resistant wall barriers, properly installed step flashing directs water safely away from vulnerable roof to wall intersections. When this system functions correctly, it protects the roof deck, wall framing, insulation, and interior finishes from moisture damage.
Over time, however, flashing may deteriorate because of aging, corrosion, severe weather, roof movement, or improper installation. Recognizing early warning signs such as water stains, rust, lifted shingles, damp attic insulation, or recurring leaks allows homeowners to address problems before they develop into costly structural repairs.
Successful flashing repairs involve much more than replacing damaged metal. Careful inspection, proper material selection, correct overlap, accurate fastening, and seamless integration with surrounding roofing components all contribute to long lasting performance. Whether replacing individual flashing pieces or installing an entirely new flashing system, attention to detail remains essential throughout the repair process.
Routine maintenance further extends the life of dormer flashing. Annual inspections, debris removal, prompt shingle repairs, and professional evaluations after severe storms help identify developing issues while they remain manageable. Preventive care not only protects the flashing itself but also strengthens the overall roofing system.
Dormers add beauty, character, and valuable living space to a home, but they also require dependable waterproofing where the roof meets the walls. By understanding how step flashing works, recognizing signs of deterioration, and investing in timely professional repairs, homeowners can preserve the integrity of their roof, prevent unnecessary water damage, and extend the lifespan of both the dormer and the entire roofing system for many years to come.