

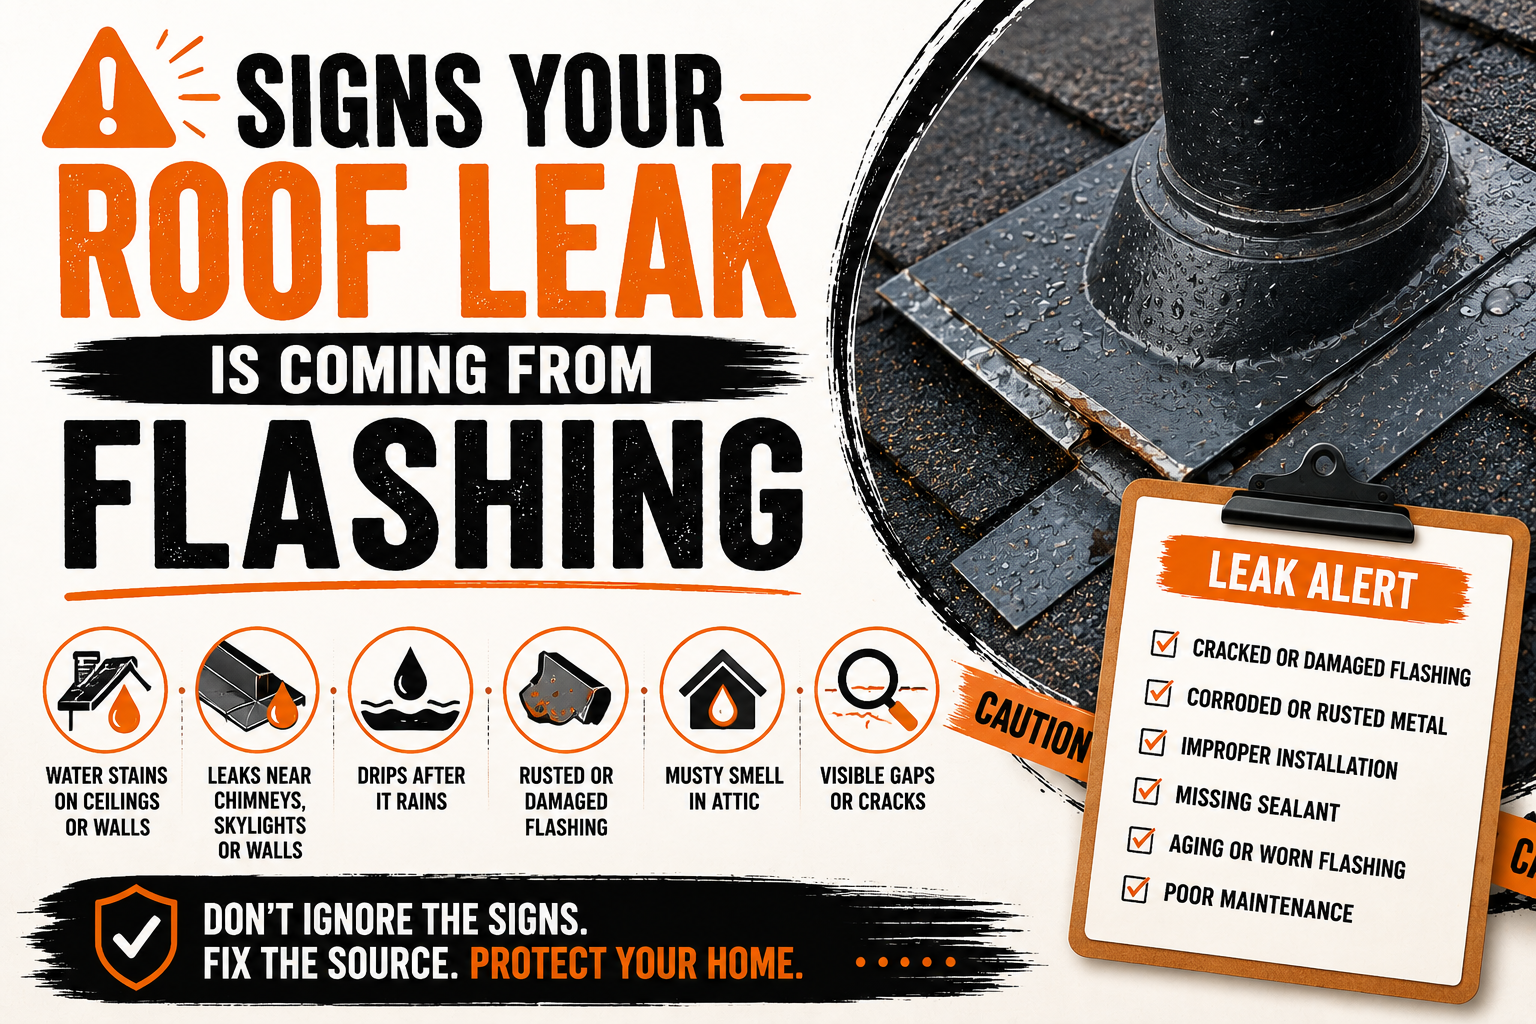
Signs Your Roof Leak Is Coming From Flashing
Introduction
A roof leak is one of those home problems that often starts small but can quickly become expensive if it goes unnoticed. Many homeowners assume that broken or missing shingles are always responsible when water begins dripping from the ceiling. While damaged shingles certainly cause leaks, they are not always the culprit. In many cases, the real problem is hidden within the roof flashing, a critical component that protects the most vulnerable parts of your roof from water intrusion.
Flashing is designed to create a waterproof barrier around roof penetrations and joints where shingles alone cannot provide complete protection. When flashing becomes loose, rusted, cracked, or improperly sealed, rainwater can slip beneath your roofing materials and travel through the roof structure before appearing inside your home. Because the leak often shows up several feet away from its actual source, homeowners frequently misdiagnose the problem and delay the proper repair.
Recognizing the warning signs of flashing failure can help you take action before minor moisture intrusion becomes major structural damage. Water that enters through damaged flashing can affect insulation, wood framing, drywall, paint, flooring, and even your home’s indoor air quality if mold begins to develop. Identifying these issues early often means a simpler and less expensive repair.
In this guide, we’ll explain how roof flashing works, why it is essential for every roofing system, and the common signs that indicate your roof leak is likely coming from flashing rather than another roofing component. Understanding these warning signs will help you make informed decisions and know when it’s time to call a roofing professional.
Understanding What Roof Flashing Actually Does
Roof flashing is one of the most important parts of a roofing system, yet it is also one of the least noticed. Most homeowners rarely think about flashing because it sits beneath or alongside roofing materials and quietly performs its job every time it rains. Its purpose is simple but extremely important. Flashing directs water away from vulnerable areas of the roof where leaks are most likely to occur.
Unlike shingles, which protect large sections of the roof surface, flashing focuses on areas where two building materials meet. These transition points naturally create small gaps that water can exploit if they are not properly sealed. Flashing covers these vulnerable locations and creates a pathway that guides rainwater back onto the roof so it can safely flow toward the gutters.
Modern flashing is commonly made from aluminum, galvanized steel, copper, or other corrosion-resistant metals. These materials are selected because they can withstand years of exposure to rain, sunlight, changing temperatures, and strong winds. Even though flashing is built for durability, it is still exposed to constant weather conditions that gradually affect its performance over time.
Think of flashing as the waterproof bridge between different sections of your roof. Without it, every roof penetration would become a potential entry point for water. Even a brand-new roof with premium shingles would eventually develop leaks if flashing were missing or improperly installed.

Where Roof Flashing Is Installed and Why These Areas Are Vulnerable
One reason flashing problems are so common is that they occur in the most challenging areas of a roof. Water naturally follows gravity, and whenever the roof changes direction or another structure passes through it, additional protection becomes necessary. Flashing is installed in these locations to prevent water from finding its way inside.
Chimneys are among the most common places where flashing is installed. Since the chimney extends through the roof, there is a connection between brick masonry and roofing materials that must remain watertight throughout the year. Proper chimney flashing prevents rainwater from entering this joint during heavy storms.
Skylights also require carefully installed flashing because they interrupt the continuous surface of the roof. While skylights provide natural light inside the home, they also create additional edges where water can collect. Flashing ensures rainwater flows around the skylight instead of underneath it.
Roof valleys experience some of the highest volumes of water during rainfall because they collect runoff from two separate roof slopes. Valley flashing reinforces these sections and helps direct large amounts of water safely down the roof without allowing it to penetrate beneath the roofing materials.
Vent pipes, exhaust vents, and plumbing stacks all pass through the roof, creating circular openings that require specialized flashing. These penetrations constantly expand and contract with changing temperatures, making properly installed flashing essential for preventing leaks.
Other common flashing locations include roof-to-wall intersections, dormers, roof edges, and certain types of roof transitions. Every one of these areas experiences more water exposure than open roof sections, making them the first places roofing professionals inspect when searching for the source of a leak.
Why Roof Flashing Eventually Begins to Fail
Although flashing is designed to last for many years, it is constantly exposed to conditions that gradually reduce its effectiveness. Every season brings changes in temperature, moisture, and weather that place stress on the roofing system. Over time, these repeated cycles begin affecting both the flashing itself and the materials used to secure it.
Thermal expansion is one of the biggest reasons flashing deteriorates. Metal expands during hot summer days and contracts again when temperatures drop at night or during colder months. This repeated movement slowly loosens fasteners, weakens sealants, and creates tiny gaps where water can eventually enter.
Weather also accelerates the aging process. Strong winds may lift flashing edges, hail can dent or puncture exposed metal, and heavy rainfall repeatedly tests every seam around roof penetrations. Even if storm damage appears minor from the ground, it can compromise the flashing enough to allow moisture beneath the roof.
Corrosion is another common issue, particularly on older roofs. Protective coatings eventually wear away after years of exposure to moisture, allowing rust to develop on certain flashing materials. As corrosion spreads, the metal weakens and becomes less effective at keeping water out.
Installation quality also has a significant impact on flashing performance. Flashing that was improperly installed during the original roof construction or a previous repair may begin leaking years earlier than expected. Incorrect overlaps, poorly driven nails, or low-quality sealants can all shorten the lifespan of an otherwise durable roofing system.
Natural aging should never be overlooked either. Roofing materials are constantly exposed to sunlight, moisture, wind, and seasonal temperature changes. Even when flashing has been installed correctly, it will eventually require maintenance or replacement simply because every roofing component has a finite service life.
Early Signs Your Roof Leak May Be Coming From Flashing
Flashing problems rarely develop overnight. In many cases, homeowners notice subtle warning signs long before water begins dripping from the ceiling. Paying attention to these early symptoms can prevent a relatively small repair from becoming a much larger restoration project.
One of the earliest signs is a ceiling stain that appears after rain but dries between storms. Because flashing leaks often allow only small amounts of water inside at first, the stain may seem minor and disappear temporarily before returning after the next rainfall. This repeated pattern usually indicates that water is entering somewhere on the roof rather than coming from an indoor plumbing issue.
Another common indicator is water appearing around chimneys, skylights, or upper walls. Since flashing surrounds these roof features, leaks in these areas frequently point toward damaged or deteriorated flashing. Although other roofing problems can produce similar symptoms, flashing should always be considered one of the first possibilities.
Peeling paint or bubbling drywall near the ceiling is another warning sign homeowners often overlook. Moisture entering through damaged flashing slowly saturates drywall and weakens paint adhesion. By the time the surface begins bubbling or peeling, water has often been entering the roof for some time.
A musty odor inside the attic or upper floors can also indicate a slow flashing leak. Even small amounts of trapped moisture create conditions where mold and mildew thrive. Since these odors develop gradually, they are sometimes mistaken for normal attic smells until visible water damage appears.
Outside the home, loose flashing, visible rust, cracked roofing sealant, or lifted metal edges all deserve immediate attention. These signs do not always mean water is already entering the home, but they significantly increase the likelihood that leaks will develop if repairs are delayed.
Where Homeowners Usually Notice Flashing Leaks First
One of the reasons flashing leaks are difficult to diagnose is that water often travels before becoming visible. Instead of dripping straight down through the roof, moisture follows roof decking, rafters, insulation, and framing until it finally reaches an opening where it can escape into the living space.
Many homeowners first notice discoloration on ceilings near fireplaces because chimney flashing is one of the most common leak locations. Water entering around the chimney may travel several feet before finally soaking through drywall, making the actual source difficult to identify without a thorough inspection.
Skylights are another area where flashing leaks commonly become visible. Water stains may appear around the skylight frame or on the surrounding ceiling after periods of heavy rain. Since these windows interrupt the roof surface, proper flashing is essential for keeping moisture outside.
The attic often provides the earliest evidence of flashing failure. Damp insulation, dark stains on roof decking, mold growth, or moisture around roof penetrations can all indicate that flashing is allowing water into the roofing system. Catching these problems during an attic inspection can prevent significant interior damage later.
Exterior walls beneath roof intersections may also reveal flashing problems. Water entering around wall flashing sometimes travels downward inside wall cavities before appearing as peeling paint, swollen trim, or bubbling drywall. Because the leak follows gravity, the visible damage is often located below the actual point of entry.
How Flashing Leaks Differ From Other Roof Leaks
Not every roof leak originates from flashing, which is why proper diagnosis is so important. Missing shingles, damaged underlayment, cracked vent boots, clogged gutters, and storm damage can all allow water into a home. Understanding how flashing leaks behave helps narrow down the possible causes.
Flashing leaks usually develop around roof features such as chimneys, skylights, dormers, valleys, or roof-to-wall intersections. If water consistently appears near these locations, flashing becomes one of the first components that should be inspected. Leaks occurring across open sections of the roof are often more closely associated with damaged shingles or aging roofing materials.
The weather conditions that trigger the leak can also provide useful clues. Flashing problems often become worse during heavy rain accompanied by strong winds because wind-driven water can force itself beneath loose flashing edges. Shingle-related leaks generally occur during nearly every rainfall regardless of wind direction.
Another difference is consistency. Flashing leaks may appear only during specific storms while remaining completely dry during lighter rain. This intermittent pattern often causes homeowners to believe the problem has resolved itself when the flashing is actually continuing to deteriorate.
Although these observations can help identify the source, tracing a roof leak is rarely straightforward. Water often travels away from the damaged area before becoming visible indoors, making professional inspections the most reliable way to determine whether flashing is responsible.
Comparison Table: Flashing Leak vs. Other Common Roof Leak Sources
| Feature | Flashing Leak | Other Roof Leak Sources |
|---|---|---|
| Typical Location | Chimneys, skylights, valleys, vents, and roof-to-wall intersections | Open roof slopes, damaged shingles, aging roof sections |
| Primary Cause | Loose flashing, failed sealant, corrosion, poor installation | Missing shingles, cracked vent boots, damaged underlayment, storm damage |
| Leak Pattern | Often occurs during heavy or wind-driven rain | Usually leaks during most rain events |
| Visible Exterior Signs | Lifted flashing, rust, separated sealant, bent metal | Broken shingles, exposed decking, damaged roofing materials |
| Typical Repair | Repair, reseal, or replace flashing | Replace shingles or repair affected roofing sections |
Understanding how flashing works is the first step toward identifying whether it is responsible for your roof leak. While flashing problems can be difficult to spot at first, they often follow recognizable patterns that become easier to identify once you know where to look and what warning signs to watch for.
In the next part of this guide, we’ll explore the different types of roof flashing, explain how changing weather conditions contribute to flashing damage, and discuss the interior and exterior warning signs that should never be ignored if you suspect your roof leak is coming from flashing.
Different Types of Roof Flashing and How They Can Fail
Not all roof flashing is the same. Roofing professionals use different types of flashing depending on the roof design and the area being protected. Each type serves a specific purpose, and understanding these differences can help homeowners better recognize where a leak may be originating.
Step flashing is commonly installed where a sloped roof meets a vertical wall. Individual pieces of metal are layered with each row of shingles to create a waterproof barrier that channels rainwater away from the wall. If these pieces shift, rust, or are installed incorrectly, water can easily work its way behind the siding and into the home.
Counter flashing is most often found around chimneys. It overlaps the base flashing and prevents water from entering the joint between the masonry and the roof. Over time, mortar joints can crack or separate, allowing counter flashing to loosen and creating an easy path for water intrusion.
Valley flashing protects one of the busiest areas on a roof. Since roof valleys collect rainwater from two roof slopes, they experience much heavier water flow than most other sections. If valley flashing becomes damaged or clogged with debris, water may back up beneath the shingles instead of flowing safely toward the gutters.
Vent pipe flashing surrounds plumbing vents and other roof penetrations. These flashing systems often include a rubber boot that seals tightly around the pipe. As the rubber ages, exposure to sunlight causes it to crack, shrink, or split, eventually allowing water to enter around the pipe.
Drip edge flashing is installed along roof edges to guide water into the gutters while protecting the roof decking. If sections become bent or improperly secured, water may run behind the gutters instead of into them, leading to wood rot along the roof edge.
Although each type of flashing serves a different purpose, they all share one goal. They prevent water from reaching the roof structure. When any one of them begins to fail, even a relatively small defect can become the starting point for a much larger roofing problem.
Weather Conditions That Make Flashing Problems Worse
Roof flashing is designed to withstand changing weather conditions, but years of exposure eventually take a toll. Certain weather events place significantly more stress on flashing than normal rainfall, making existing weaknesses much more noticeable.
Heavy rain is one of the biggest tests for any roofing system. Large amounts of water move quickly across the roof, especially around valleys, chimneys, and roof penetrations. If flashing has even a small opening, heavy rain can force water through the gap before it has a chance to drain away.
Strong winds often make flashing leaks even worse. Wind-driven rain does not simply fall downward. Instead, it blows sideways beneath loose flashing edges and underneath roofing materials. This is why some homeowners only notice leaks during severe storms even though the roof appears fine during light rain.
Snow and ice can also contribute to flashing damage. As snow melts during the day and refreezes overnight, expanding ice places additional pressure on flashing joints. Repeated freeze and thaw cycles may loosen flashing, crack sealants, or create openings that continue growing over time.
Extreme summer heat creates another challenge. Metal flashing expands throughout the day and contracts as temperatures cool during the evening. This constant movement gradually weakens fasteners and sealants, making flashing more susceptible to leaks after years of seasonal temperature changes.
Hailstorms may leave behind dents that appear cosmetic but actually reduce the flashing’s ability to direct water properly. Large hailstones can also damage sealants or create small punctures that become leak points during future storms.
Weather itself rarely causes immediate flashing failure. More often, it exposes weaknesses that have been developing over months or years. This is why roof inspections following severe storms are an important part of protecting your home.

Interior Signs That Point to Flashing Damage
Many homeowners first become aware of a flashing problem after noticing changes inside their home. Unfortunately, interior damage usually means water has already been entering the roof system for some time. Recognizing these warning signs early can help limit the extent of future repairs.
Ceiling stains remain one of the clearest indicators of a roof leak. These stains typically appear as yellow, brown, or light tan discoloration that gradually expands after repeated rainstorms. While ceiling stains do not automatically confirm flashing damage, they are commonly associated with leaks around roof penetrations.
Peeling paint near the ceiling is another symptom that deserves attention. As moisture enters behind painted surfaces, it weakens adhesion and eventually causes the paint to bubble, blister, or peel away from the drywall.
Water-damaged drywall may begin to soften or sag if the leak continues for an extended period. Instead of remaining firm, affected areas become swollen and may eventually crumble under pressure. This type of damage often requires both roof repair and interior restoration.
Homeowners should also pay attention to unusual odors. Damp insulation, wet wood, and hidden mold growth often create a persistent musty smell that becomes more noticeable after rainfall. Even if you cannot see active water dripping, this odor may indicate moisture is accumulating behind finished surfaces.
The attic frequently provides additional clues. Dark stains on roof decking, damp insulation, mold growth near roof penetrations, or visible water trails along rafters all suggest that moisture is entering somewhere above. Since flashing surrounds many roof openings, these areas should receive careful inspection.
Exterior Signs You Should Never Ignore
Exterior inspections often reveal flashing problems before they create significant interior damage. While climbing onto the roof should be left to trained professionals, many warning signs can be observed safely from the ground using binoculars or by walking around the property.
Lifted or bent flashing is one of the most obvious signs that repairs may be needed. Flashing should remain tightly secured against the roof surface. If sections appear raised or out of place, wind and rain can easily work beneath them.
Rust should also be taken seriously. Although minor surface discoloration may simply reflect aging, widespread corrosion weakens the flashing and increases the likelihood of leaks. Corroded flashing often becomes thinner over time until holes eventually develop.
Cracked or missing sealant around flashing is another warning sign. Roofing sealants naturally deteriorate after years of exposure to sunlight and changing temperatures. Once these seals fail, water gains easier access beneath the flashing.
Loose shingles near chimneys, skylights, or roof valleys may also indicate flashing movement underneath. Since flashing and shingles work together as part of the same waterproofing system, problems affecting one component often impact the other.
Debris accumulation deserves attention as well. Leaves, branches, and dirt that remain trapped around flashing hold moisture against the roof for extended periods. This constant moisture exposure accelerates corrosion while increasing the risk of water backing up beneath roofing materials.
Common Installation Mistakes That Lead to Flashing Leaks
Not every flashing leak develops because of age or weather. In many cases, the problem can be traced back to installation mistakes made during roof construction or previous repair work. Even high-quality flashing materials cannot perform properly if they are installed incorrectly.
One of the most common mistakes is improper overlap. Flashing pieces must be layered correctly so water naturally flows over each section instead of underneath it. Incorrect overlaps create hidden gaps that may not leak immediately but become problematic during heavy rainfall.
Using the wrong fasteners is another issue. Nails or screws placed in exposed areas may create unnecessary openings where water can enter. Professional roofers carefully position fasteners to minimize the risk of future leaks.
Another frequent mistake involves relying too heavily on roofing sealant. While sealants play an important role, they should never replace proper flashing installation. Sealants eventually deteriorate, but correctly installed flashing continues directing water even after sealant begins aging.
Poorly fitted flashing around chimneys and skylights also contributes to many roof leaks. If flashing does not sit flush against adjoining materials, wind-driven rain can work underneath the metal and gradually damage the surrounding roof structure.
Hiring experienced roofing professionals significantly reduces the likelihood of these problems. Proper installation techniques ensure flashing performs as intended for many years while minimizing the need for premature repairs.
Can You Repair Flashing Yourself or Should You Call a Professional?
It can be tempting to repair flashing yourself after noticing a leak, especially if the problem appears minor. However, flashing repairs are often more complicated than they seem because the visible damage is not always the actual source of the leak.
Applying roofing caulk over damaged flashing may temporarily reduce water intrusion, but it rarely addresses the underlying issue. If flashing has shifted, corroded, or was installed incorrectly, surface repairs usually provide only short-term relief before the leak returns.
Walking on a roof also presents safety risks, particularly on steep slopes or wet surfaces. Without proper equipment and experience, homeowners increase the risk of both personal injury and accidental roof damage while attempting repairs.
Professional roofers understand how different flashing systems interact with surrounding roofing materials. Instead of simply sealing visible gaps, they inspect the entire area to determine whether flashing requires repair, resealing, or complete replacement.
Although small maintenance tasks such as clearing debris from roof valleys can sometimes be handled safely from the ground, structural flashing repairs are generally best left to qualified professionals. Accurate diagnosis is often the difference between solving the problem permanently and dealing with recurring leaks.
Situations Where the Leak Is Not Actually Caused by Flashing
While flashing is a common source of roof leaks, it should not automatically be blamed every time water enters a home. Several other roofing problems can produce similar symptoms, making a careful inspection essential before beginning repairs.
Missing or broken shingles are among the most common alternative causes. When shingles become damaged during storms, water may enter directly through the exposed roof surface rather than around flashing.
Damaged roof underlayment can also allow moisture into the home. Although underlayment remains hidden beneath the shingles, it serves as an important secondary moisture barrier. If it deteriorates over time, leaks may develop even when flashing remains intact.
Clogged gutters sometimes create conditions that resemble flashing failure. When gutters overflow, water backs up beneath roof edges and may eventually enter the home through areas that appear unrelated to the actual blockage.
Poor attic ventilation may also contribute to moisture problems that homeowners mistake for roof leaks. Excess condensation forming inside the attic can produce damp insulation, stained wood, and mold growth without any rainwater entering through the roof.
Because several roofing issues share similar symptoms, professional inspections remain the most reliable way to determine whether flashing is truly responsible for the leak.
Warning Signs That Require Immediate Roofing Attention
Some flashing problems can safely wait a short time before repairs are scheduled, but others require immediate professional attention to prevent significant structural damage. Ignoring these warning signs often allows water to continue entering the home and increases repair costs.
- Active water dripping inside the home during rainfall.
- Rapidly growing ceiling stains or sagging drywall.
- Visible loose or missing flashing after a storm.
- Large amounts of rust or corrosion around flashing.
- Mold growth accompanied by persistent moisture odors.
- Water entering around chimneys, skylights, or roof valleys after every rain.
If you notice one or more of these warning signs, it is best to schedule a professional roof inspection as soon as possible. Delaying repairs gives moisture additional time to spread through insulation, wood framing, and other structural components that are far more expensive to repair than the flashing itself.
Now that we’ve covered the different types of flashing, how weather affects them, and the warning signs that indicate repairs should not be postponed, the next part of this guide will focus on how roofing professionals diagnose flashing leaks, the repair options available, and the steps homeowners can take to prevent future flashing problems.
How Roofing Professionals Diagnose Flashing Leaks
Finding the exact source of a roof leak is not always as simple as looking for water stains inside the house. Experienced roofing professionals understand that water can travel along rafters, roof decking, insulation, and framing before finally becoming visible. Because of this, the location of an interior leak is often different from the point where water actually entered the roof.
A professional inspection usually begins with a visual examination of the roof’s most vulnerable areas. Roofers carefully inspect chimneys, skylights, roof valleys, plumbing vents, dormers, and roof-to-wall intersections because these are the locations where flashing is commonly installed. They also look for rust, loose flashing, cracked sealants, lifted edges, and other signs of deterioration.
Inside the attic, roofing professionals search for moisture trails, stained roof decking, wet insulation, mold growth, and damaged wood framing. These clues help determine how long the leak has been active and allow them to trace water back toward its point of entry.
In some situations, roofers may perform controlled water testing. This involves applying water to specific roof sections while another technician monitors the attic or interior for signs of leakage. By testing one area at a time, they can isolate the damaged flashing without replacing roofing materials unnecessarily.
A thorough inspection does more than locate the current leak. It also identifies nearby flashing that may be approaching the end of its service life. Addressing these areas early can help prevent future leaks and reduce long-term maintenance costs.
Repair Options for Damaged Roof Flashing
The appropriate repair depends on the condition of the flashing and the extent of the damage. Some flashing problems are relatively minor and can be corrected without replacing large sections of the roof, while others require more extensive work to restore proper waterproofing.
If the flashing is structurally sound but the sealant has deteriorated, cleaning the area and applying a new high-quality roofing sealant may be enough to restore a watertight seal. This type of repair is most effective when the metal itself remains in good condition and has not shifted from its original position.
Loose flashing can often be secured again if it has not been bent or damaged. Roofing professionals carefully reposition the flashing, replace damaged fasteners if necessary, and ensure the surrounding shingles remain properly aligned to maintain effective water drainage.
When corrosion has weakened the flashing or holes have developed, replacing the damaged section is usually the better solution. Attempting to patch severely deteriorated flashing often results in recurring leaks because the surrounding metal continues to weaken over time.
Some repairs require temporarily removing nearby shingles to access the flashing beneath. Although this process takes more time, it allows the flashing to be installed correctly and ensures that all roofing components work together as intended.
The goal of any flashing repair is not simply to stop the current leak. A proper repair restores the roof’s ability to direct water away from vulnerable areas while protecting the surrounding roofing materials from future damage.
When Flashing Replacement Is the Better Choice
There are situations where repairing flashing is no longer the most practical option. If the metal has reached the end of its lifespan or multiple sections have failed, replacing the flashing often provides a more reliable and cost-effective long-term solution.
Extensive rust is one of the clearest indicators that replacement may be necessary. Once corrosion begins eating through the metal, patches and sealants become temporary fixes rather than permanent solutions. Replacing the flashing eliminates the weakened material and restores proper protection.
Flashing replacement is also recommended when major roof renovations are being performed. If you are replacing shingles or installing a new roof, leaving old flashing in place may increase the risk of future leaks. Many roofing contractors recommend installing new flashing during roof replacement to maximize the lifespan of the entire roofing system.
Repeated leaks around the same roof feature can also indicate that replacement is the best option. If previous repairs have failed to solve the problem, the flashing may have underlying issues that cannot be corrected with additional sealant or patchwork.
Although replacing flashing involves a larger upfront investment than minor repairs, it often prevents repeated service calls and protects the roof from continued water intrusion. Choosing replacement at the right time can ultimately save homeowners money by avoiding extensive structural repairs later.
How Regular Roof Maintenance Prevents Future Flashing Leaks
Routine maintenance is one of the most effective ways to extend the life of roof flashing and reduce the likelihood of unexpected leaks. Many flashing problems begin as small issues that can be corrected quickly when discovered during regular inspections.
Scheduling professional roof inspections at least once a year allows roofing experts to identify loose flashing, deteriorated sealants, corrosion, and other early warning signs before they become major problems. Homes located in areas with frequent storms may benefit from additional inspections after severe weather events.
Keeping the roof free of leaves, branches, and other debris also helps protect flashing. Debris traps moisture against the roof surface, accelerating corrosion while preventing water from flowing properly through valleys and into the gutters.
Cleaning gutters is equally important. Overflowing gutters can force water back beneath roof edges, increasing the amount of moisture surrounding flashing and other roofing components. Proper drainage reduces unnecessary stress on the entire roofing system.
Homeowners should also perform occasional visual inspections from the ground. Looking for bent flashing, rust, missing shingles, or damaged roof areas after storms provides an opportunity to schedule repairs before water reaches the interior of the home.
Practical Tips to Extend the Life of Roof Flashing
While every roofing system eventually requires maintenance, homeowners can take several simple steps to help flashing last as long as possible. These preventative measures reduce unnecessary wear while improving the overall performance of the roof.
- Schedule a professional roof inspection every year and after major storms.
- Keep gutters and downspouts clean so water drains properly.
- Remove leaves, branches, and debris that collect in roof valleys.
- Address small flashing problems as soon as they are discovered instead of waiting for visible leaks.
- Avoid walking on the roof unnecessarily because excessive foot traffic can damage flashing and surrounding shingles.
- Choose experienced roofing contractors whenever repairs or roof replacements are needed.
These simple maintenance habits can significantly reduce the likelihood of flashing-related leaks. While they cannot prevent natural aging, they help ensure that minor problems are corrected before they develop into expensive repairs.

Steps to Take When You Discover a Roof Leak
Discovering water inside your home can be alarming, but taking the right steps immediately can reduce damage while you arrange for professional repairs. Acting quickly helps protect your belongings and limits the amount of moisture that enters your home’s structure.
The first priority is protecting the interior. Place a bucket or container beneath active drips and move furniture, electronics, or valuable belongings away from the affected area. If water begins collecting in the ceiling, avoid puncturing the drywall unless absolutely necessary, as doing so incorrectly may create additional damage.
If it is safe to do so, inspect the attic for visible signs of water intrusion. Look for damp insulation, water stains, or active dripping around roof penetrations such as chimneys, vents, or skylights. Avoid walking on insulation or damaged ceiling materials since they may not support your weight safely.
Document the damage by taking clear photographs of ceiling stains, water intrusion, and any affected belongings. These records may be helpful if you need to file a homeowner’s insurance claim or discuss repairs with a roofing contractor.
Finally, contact a qualified roofing professional as soon as possible. Temporary measures may reduce immediate water intrusion, but a complete inspection is necessary to determine whether flashing, shingles, or another roofing component is responsible for the leak.
Frequently Asked Questions About Roof Flashing Leaks
Can roof flashing leak even if my shingles look fine?
Yes. Flashing and shingles perform different functions, and flashing can fail even when the surrounding shingles remain in good condition. Loose flashing, deteriorated sealants, or corrosion can allow water into the roof without any visible shingle damage.
How long does roof flashing usually last?
The lifespan depends on the material, installation quality, local weather conditions, and maintenance. In many cases, properly installed metal flashing lasts for decades, but periodic inspections are still recommended because sealants and surrounding roofing materials age over time.
Can a small flashing leak become a serious problem?
Absolutely. Even a slow leak allows moisture to enter the roof structure repeatedly. Over time, this can damage insulation, roof decking, framing, drywall, and encourage mold growth, making repairs much more expensive than addressing the flashing early.
Should flashing always be replaced during a roof replacement?
Many roofing professionals recommend replacing flashing whenever a new roof is installed, particularly if the existing flashing shows signs of age or deterioration. Installing new flashing alongside new roofing materials helps create a complete waterproof system and reduces the likelihood of future leaks.
Can I inspect flashing myself?
You can perform a basic visual inspection from the ground using binoculars and by checking your attic for signs of moisture. However, walking on the roof can be dangerous, and determining the exact cause of a leak often requires the experience of a qualified roofing professional.
Conclusion
Roof flashing may not be the most visible part of your roofing system, but it plays one of the most important roles in protecting your home from water damage. By creating a watertight barrier around chimneys, skylights, vents, roof valleys, and wall intersections, flashing helps prevent moisture from reaching the structural components beneath your roof. When flashing begins to fail, even a small opening can allow water to enter and create problems that become increasingly expensive over time.
Learning to recognize the warning signs of flashing failure gives homeowners a valuable advantage. Ceiling stains, peeling paint, damp attic insulation, rusted flashing, cracked sealants, and leaks around roof penetrations all deserve prompt attention. Addressing these issues early often prevents extensive repairs and extends the life of the entire roofing system.
Regular inspections, routine maintenance, and timely repairs are the most effective ways to keep flashing performing as intended. Whether your roof is relatively new or has protected your home for many years, taking a proactive approach helps reduce the risk of unexpected leaks and protects your investment.
If you suspect your roof leak is coming from flashing, don’t wait until minor water intrusion becomes significant structural damage. A professional roof inspection can identify the source of the problem, recommend the most appropriate repair, and restore the protection your home needs for years to come.